Vehicle Dynamic Modeling
Vehicle dynamic modeling service employs the supervised machine learning algorithm to generate a learning-based vehicle dynamic model, which can be used as the customized dynamic model in the Apollo simulation platform for control-in-the-loop simulation. The usage of the dynamic modeling asks for three main steps: (1) collect the training/test data for learning-based modeling, via a frontend data collection process monitoring system, (2) upload the collected data into cloud by locally build the standard BOS-linked folder, and (3) submit the service command via the online service webpage and expect the modeling results within email notice.
Frontend
In DreamView, a data collection monitor is presented for monitoring the data collection process. After the user selects the “Vehicle Calibration” option in the “setup_mode” menu, the data collection process is visualized in the data collection monitor. Driving data are categorized into different driving conditions, as shown in the following figure. The amounts of collected data (in unit of frame) are indicated as progress bars.
Setup
In the on-vehicle DreamView environment,
Choose
vehicle calibrationin--setup mode--,Choose
Data Collection MonitoratOtherspanel.
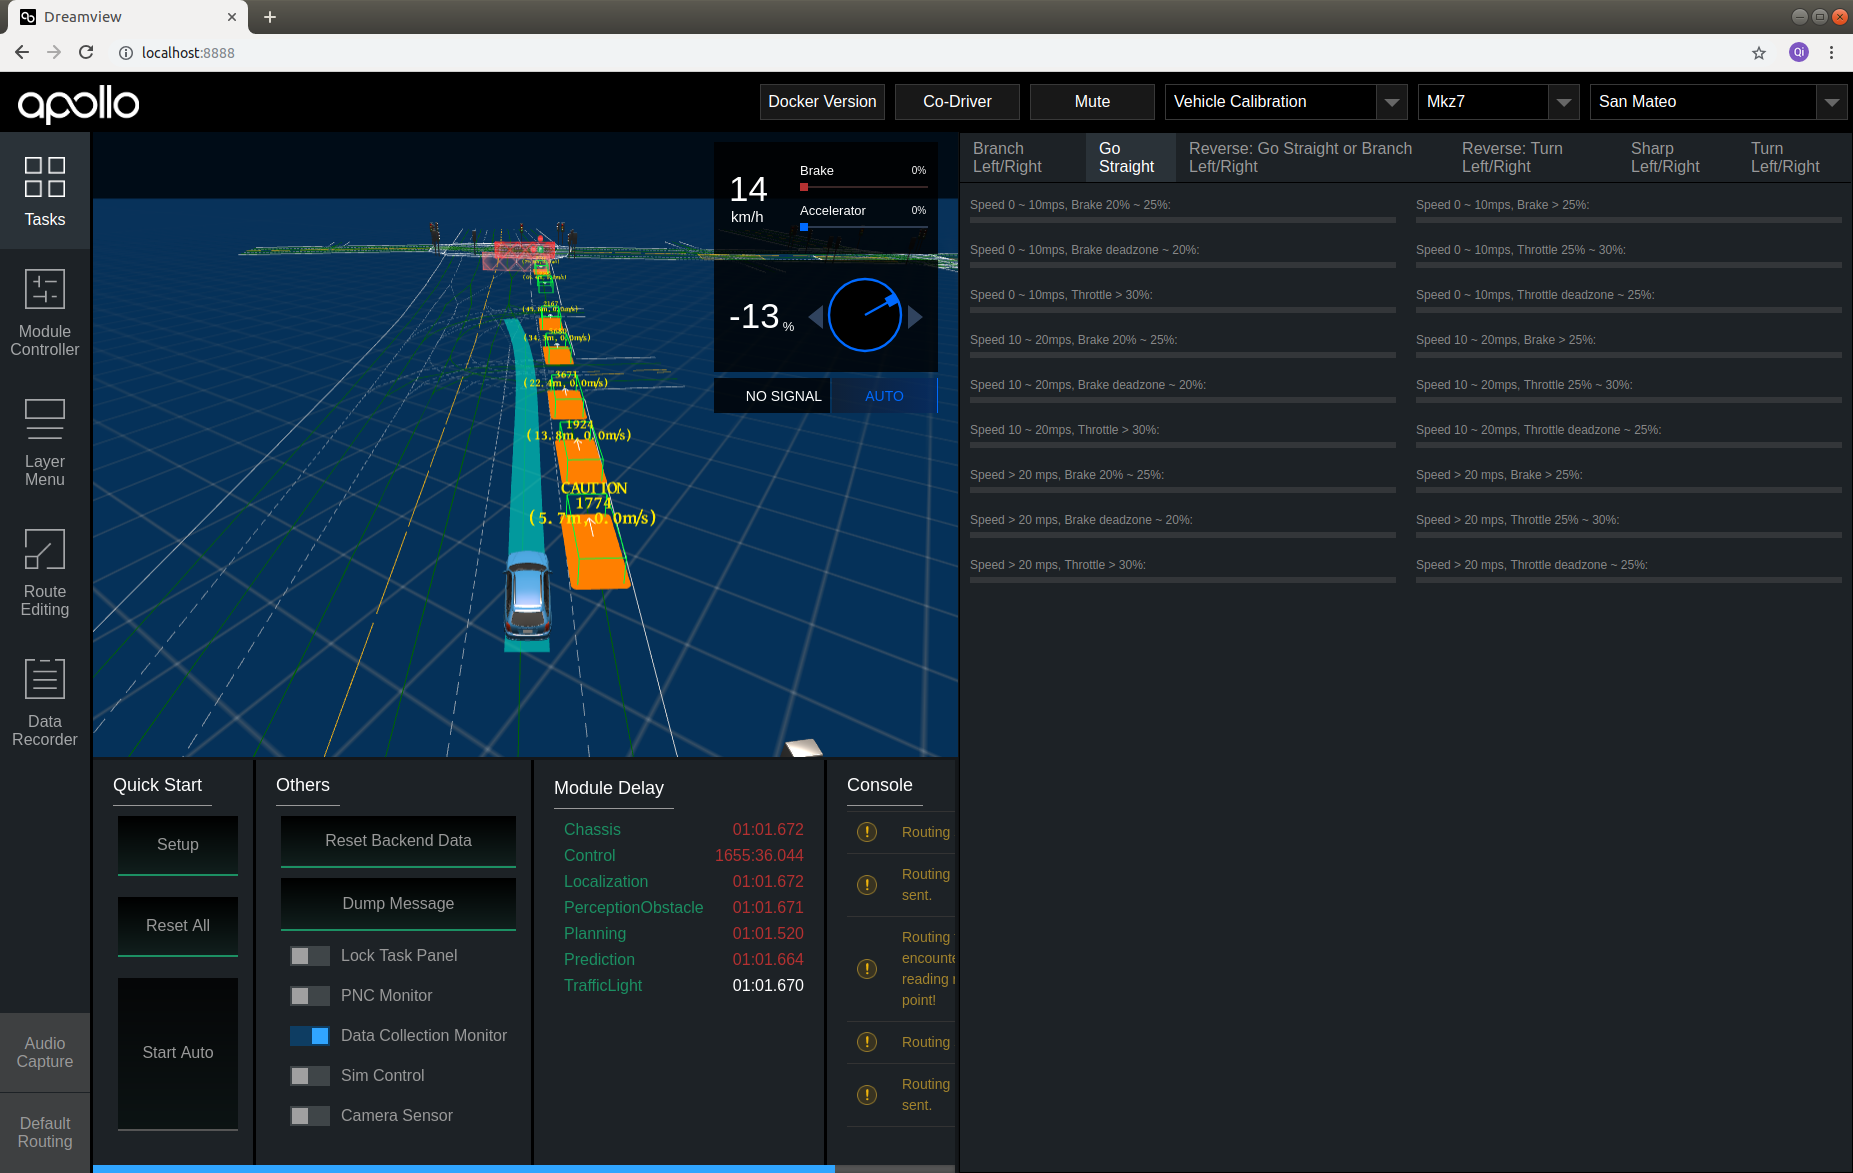
The data collection monitor is displayed in DreamView.
Data collection
When driving, data frames are automatically processed by identifying their driving status form the Chassis Channel messages. When a single data frame satisfies the speed criterion (speed equal or larger than 0.2 mps), the single data frame is categorized by its steering, speed and throttle/brake information. The data collection process is presented in progress bars of the data collection monitor.
There are 21 progress bars in total in data collection monitor. The overall process is indicated by the top progress bar. The rest 20 progress bars indicate 20 driving conditions, including
Six brake conditions at different speed level
low speed (<10 mps) brake pulse
middle speed (10 mps ~ 20 mps ) brake pulse
high speed (>=20 mps) brake pulsing
low speed ( <10 mps) brake tap
middle speed (10 mps ~ 20 mps ) brake tap
high speed (>=20 mps) brake tap
Six throttle conditions at different speed level
low speed (<10 mps) under throttle
middle speed (10 mps ~ 20 mps ) under throttle
high speed (>=20 mps) under throttle
low speed ( <10 mps) harsh throttle
middle speed (10 mps ~ 20 mps ) harsh throttle
high speed (>=20 mps) harsh throttle
Eight steering angle conditions
left 0% ~ 20%
left 20% ~ 40%
left 40% ~ 60%
left 60% ~ 100%
right 0% ~ 20%
right 20% ~ 40%
right 40% ~ 60%
right 60% ~ 100%
For each bar, there is a blue ribbon indicating collected data frames. When the blue ribbon fills the whole bar, the number of collected frames reaches the target number. There is also a number at right end of each bar indicating the completion percentage. For dynamic modeling data collection, when the all the progress bars reaches 100%, the data collection process is considered as “completed”.
All data are saved in nvme drive or data/record/
Vehicle Configuration
The brake and throttle specs are different between vehicle models. Therefore, the criteria for brake pulsing/tap and hash/under throttle depend on vehicle models. The default setting is based on Lincoln MKZ model. For different vehicle models, these parameters are configurable at
/apollo/modules/dreamview/conf/mkz7_data_collection_table.pb.txt
(description)
Folder Structure Requirement
Before uploading your data, take a note of:
The folder structure to be maintained is:
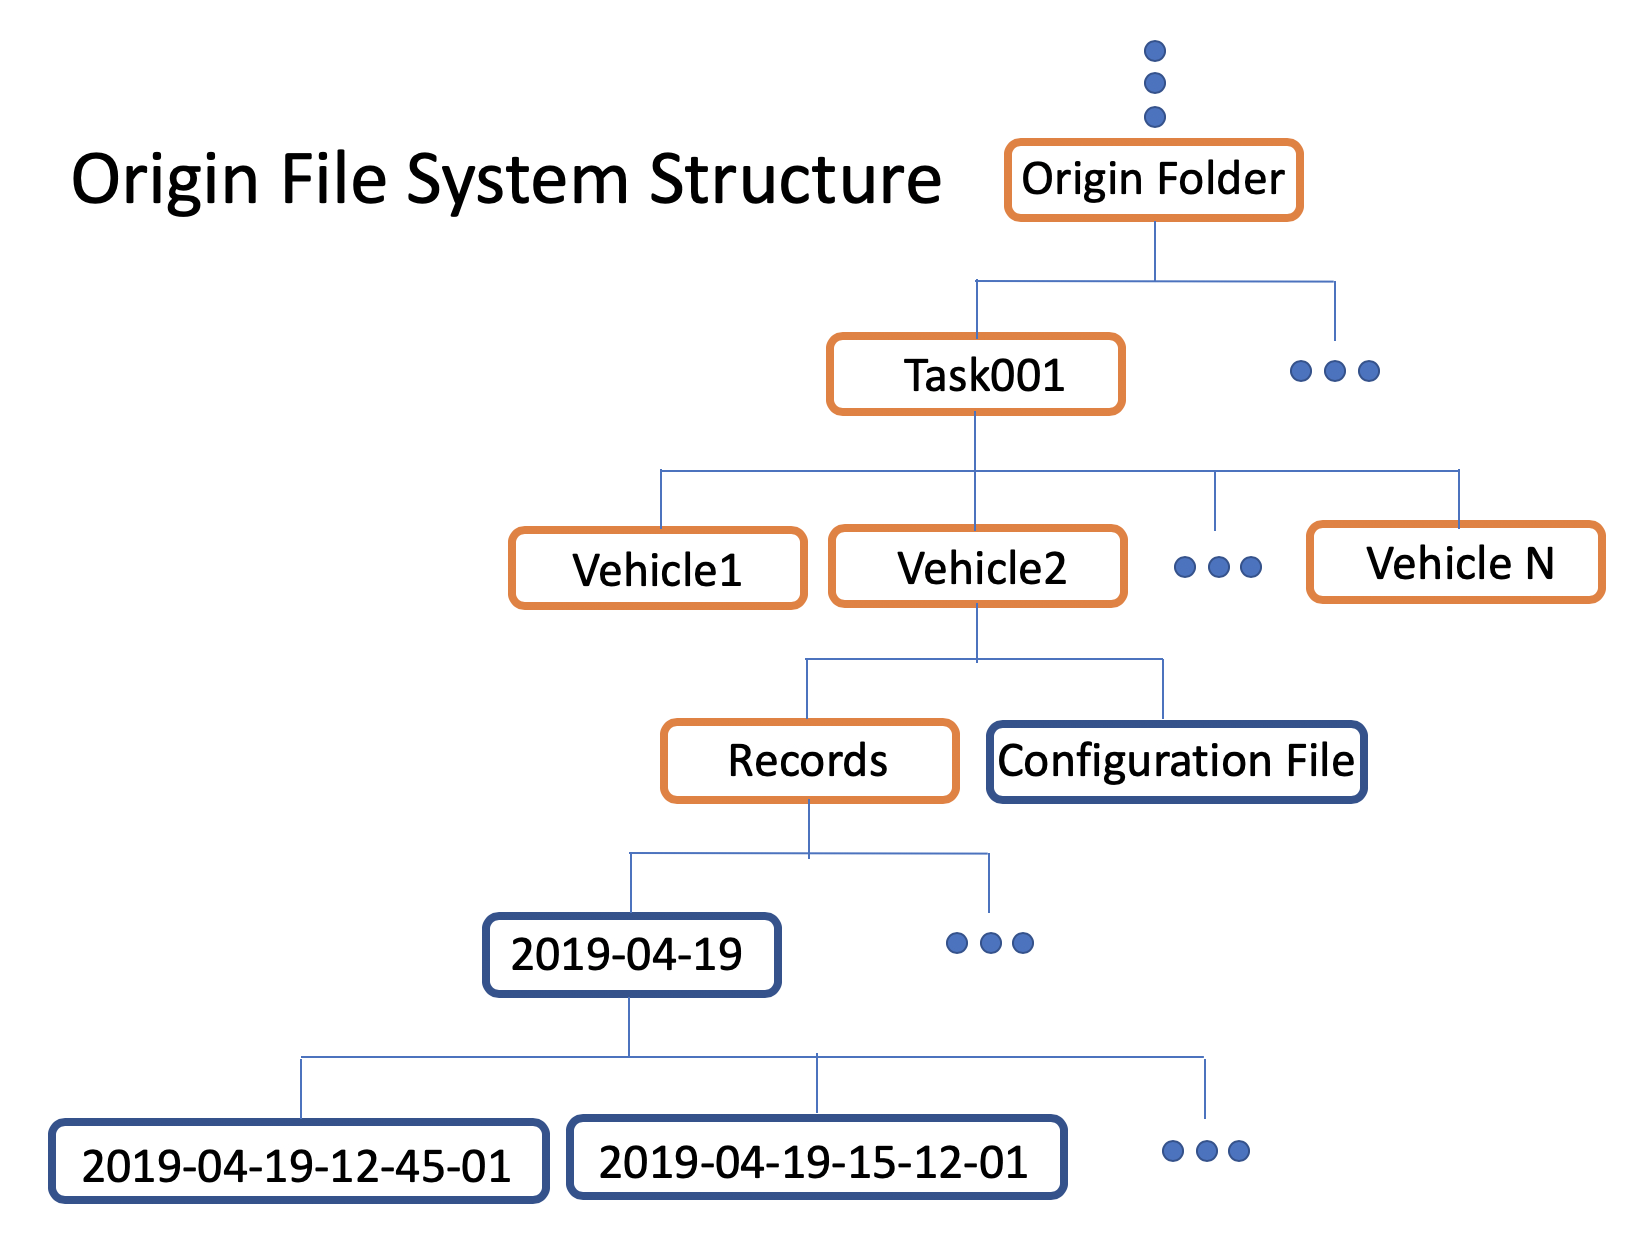
As seen above, the file structure to be maintained is
Origin Folder -> Task Folder -> Vehicle Folder -> Records Folder + Configuration files
A task folder needs to be created for your dynamic modeling job, such as task001, task002…
A vehicle folder needs to be created for your vehicle. The name of the folder should be the same as seen in Dreamview
Inside your folder, create a Records folder to hold the data
Store all the Configuration files along with the Records folder, within the Vehicle folder
The vehicle configuration file (vehicle_param.pb.txt) is updated since Apollo 5.0 and later, you should check it
One task folder can contain more than one vehicle folder, in other words, you may train models for multiple vehicles in one training job
Upload Data
Use bosfs to mount your bucket to local, for example,
BUCKET=<bucket>
AK=<access key>
SK=<secret key>
MOUNT=/mnt/bos
# It's required to provide correct BOS region. Please read the document
# https://cloud.baidu.com/doc/BOS/S3.html#.E6.9C.8D.E5.8A.A1.E5.9F.9F.E5.90.8D
REGION=bj

mkdir -p "${MOUNT}"
bosfs "${BUCKET}" "${MOUNT}" -o allow_other,logfile=/tmp/bos-${BUCKET}.log,endpoint=http://${REGION}.bcebos.com,ak=${AK},sk=${SK}
Then you can copy the prepared data folder to somewhere under /mnt/bos.
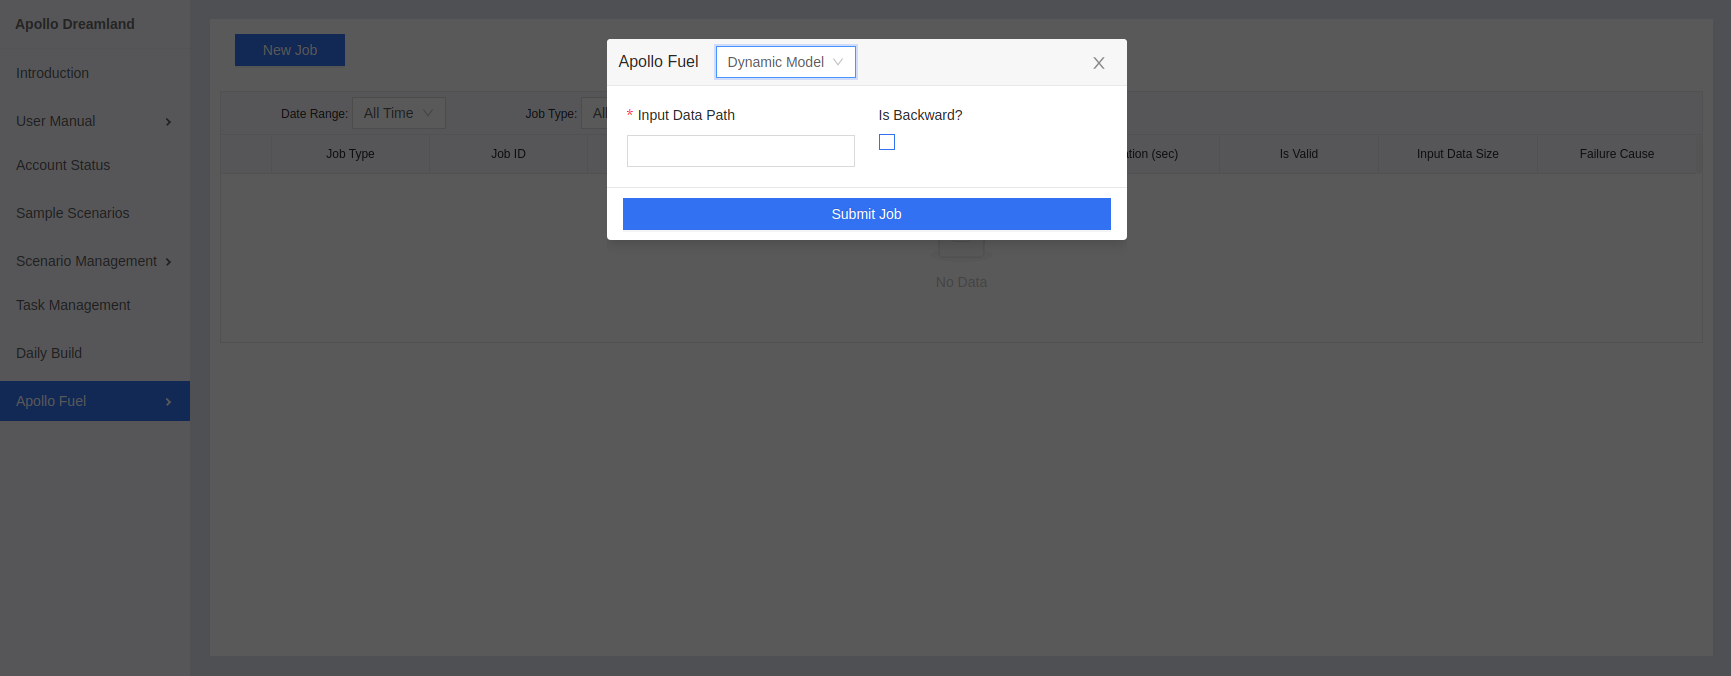
Submit Job Via On-Line Service Website
Login in the Apollo webpage and choose the Apollo Fuel -> New Job in the functionality menu. Select the Dynamic Model option in the New Job menu,and then fill the Input Data Path with the data storage path starting from the root directory under your BOS folder, and choose whether click the is backward radio button (Only click it if you intend to train the dynamic model under the backward driving mode; otherwise, leave it blank). Finally, submit your job by clicking the Submit Job button。
Receive Model Training Results
After the dynamic modeling job successfully starts and your uploaded data passes the sanity check, the user will receive the first notice email at your registered email address.
Then, after the dynamic modeling job is fully finished, the user will receive the second notice email, in which the generated model storage path and filtered data visualization path under your own BOS folder will be provided.

To use these generated dynamic models in the simulation platform or the Control_Auto_Tuning service, the users need to rename the received dynamic models and put them in the corresponding github repo path as follows: provide the forward-driving model at github apollo/modules/control/conf/dynamic_model_forward.bin; backward-driving model at github apollo/modules/control/conf/dynamic_model_backward.bin.