在 bare metal Arm® Cortex®-M55 CPU 和 Ethos™-U55 NPU 上运行 TVM
导航
在 bare metal Arm® Cortex®-M55 CPU 和 Ethos™-U55 NPU 上运行 TVM#
原作者:Grant Watson
本节包含如何在 bare metal 使用 TVM 在 Arm® Cortex®-M55 CPU 和 Ethos™-U55 NPU 上运行模型的例子。Cortex®-M55 是小型、低功耗的 CPU,专为嵌入式设备设计。Ethos™-U55 是 microNPU,专门用于加速资源有限的嵌入式设备中的 ML 推理。
为了运行演示应用程序,无需访问 Cortex®-M55 和 Ethos™-U55 开发板,将在固定的虚拟平台(Fixed Virtual Platform,简称 FVP)上运行示例应用程序。FVP 基于 Arm® Corstone™-300 软件,模型的硬件系统包含 Cortex®-M55 和 Ethos™-U55。它提供了适合于软件开发的程序员的视图。
在本教程中,将编译 MobileNet v1 模型,并指示 TVM 在可能的情况下将算子卸载到 Ethos™-U55。
获取 TVM#
为您的平台获取 TVM,请访问 https://tlcpack.ai/ 并遵循说明。一旦正确安装了 TVM,您应该可以从命令行访问 tvmc。
在命令行输入 tvmc 应该显示如下:
usage: tvmc [-h] [-v] [--version] {tune,compile,run} ...

    TVM compiler driver

    optional arguments:
      -h, --help          show this help message and exit
      -v, --verbose       increase verbosity
      --version           print the version and exit

    commands:
      {tune,compile,run}
        tune              auto-tune a model
        compile           compile a model.
        run               run a compiled module

  TVMC - TVM driver command-line interface
安装附加的 Python 依赖项#
为了运行演示,您将需要一些额外的 Python 包。这些可以通过使用需求来安装。以下文件:
:caption: requirements.txt
:name: requirements.txt

attrs==21.2.0
cloudpickle==2.0.0
decorator==5.1.0
ethos-u-vela==3.2.0
flatbuffers==1.12
lxml==4.6.3
nose==1.3.7
numpy==1.19.5
Pillow==8.3.2
psutil==5.8.0
scipy==1.5.4
synr==0.4
tflite==2.4.0
tornado==6.1
这些包可以通过在命令行运行以下命令来安装:
pip install -r requirements.txt
获得模型#
在本教程中,将使用 MobileNet v1。MobileNet v1 是用于对图像进行分类的卷积神经网络,已经针对边缘设备进行了优化。将使用的模型已经经过了预训练,可以将图像分类为 1001 个不同的类别之一。该网络的输入图像大小为 224x224,所以任何输入的图像在使用前都需要调整到这些尺寸。
在本教程中,将使用 Tflite 格式的模型。
mkdir -p ./build
cd build
wget https://storage.googleapis.com/download.tensorflow.org/models/mobilenet_v1_2018_08_02/mobilenet_v1_1.0_224_quant.tgz
gunzip mobilenet_v1_1.0_224_quant.tgz
tar xvf mobilenet_v1_1.0_224_quant.tar
为 Arm® Cortex®-M55 CPU 和 Ethos™-U55 NPU 编译模型#
一旦下载了 MobileNet v1 模型,下一步就是编译它。为此,将使用 tvmc 编译。从编译过程中得到的输出是编译为目标平台的模型库格式(MLF)的模型的 TAR 包。将能够使用 TVM 运行时在目标设备上运行该模型。
!python -m tvm.driver.tvmc compile --target="ethos-u -accelerator_config=ethos-u55-256, c" \
             --target-c-mcpu=cortex-m55 \
             --runtime=crt \
             --executor=aot \
             --executor-aot-interface-api=c \
             --executor-aot-unpacked-api=1 \
             --pass-config tir.disable_vectorize=1 \
             ./build/mobilenet_v1_1.0_224_quant.tflite \
             --output-format=mlf
tvmc 编译参数的解释
--target="ethos-u -accelerator_config=ethos-u55-256, c": offload operators to the Ethos™-U55 NPU where possible and fall back to using generated C code on the Cortex®-M where an operator is not supported on the NPU…--target-c-mcpu=cortex-m55: Cross-compile for the Cortex®-M55.--runtime=crt: Generate glue code to allow operators to work with C runtime.--executor=aot: Use Ahead Of Time compiltaion instead of the Graph Executor.--executor-aot-interface-api=c: Generate a C-style interface with structures designed for integrating into C apps at the boundary.--executor-aot-unpacked-api=1: Use the unpacked API internally.--pass-config tir.disable_vectorize=1: Disable vectorize since there are no standard vectorized types in C../mobilenet_v1_1.0_224_quant.tflite: The TFLite model that is being compiled.--output-format=mlf: Output should be generated in the Model Library Format.
将生成的代码提取到当前目录#
tar xvf module.tar
获得 ImageNet 标签#
When running MobileNet v1 on an image, the result is an index in the range 0 to 1000. In order to make our application a little more user friendly, instead of just displaying the category index, we will display the associated label. We will download these image labels into a text file now and use a python script to include them in our C application later.
curl -sS  https://raw.githubusercontent.com/tensorflow/tensorflow/master/tensorflow/lite/java/demo/app/src/main/assets/labels_mobilenet_quant_v1_224.txt \
  -o ./labels_mobilenet_quant_v1_224.txt
Getting the input image#
As input for this tutorial, we will use the image of a cat, but you can substitute an image of your choosing.
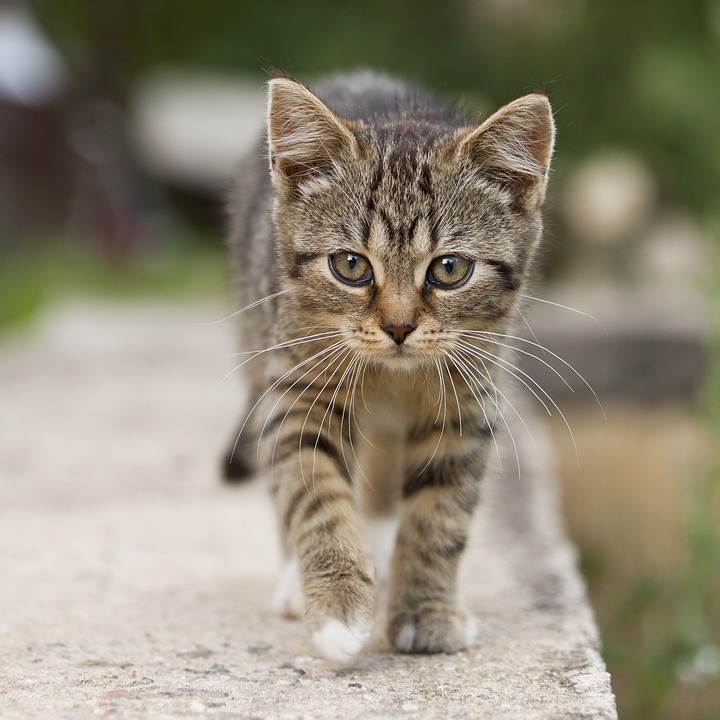
We download the image into the build directory and we will use a python script in the next step to convert the image into an array of bytes in a C header file.
curl -sS https://s3.amazonaws.com/model-server/inputs/kitten.jpg -o ./kitten.jpg
Pre-processing the image#
The following script will create 2 C header files in the src directory:
inputs.h- The image supplied as an argument to the script will be converted to an array of integers for input to our MobileNet v1 model.outputs.h- An integer array of zeroes will reserve 1001 integer values for the output of inference.
 #!python ./convert_image.py
 import os
 import pathlib
 import re
 import sys
 from PIL import Image
 import numpy as np


 def create_header_file(name, section, tensor_name, tensor_data, output_path):
     """
     This function generates a header file containing the data from the numpy array provided.
     """
     file_path = pathlib.Path(f"{output_path}/" + name).resolve()
     # Create header file with npy_data as a C array
     raw_path = file_path.with_suffix(".h").resolve()
     with open(raw_path, "w") as header_file:
         header_file.write(
             "#include <tvmgen_default.h>\n"
             + f"const size_t {tensor_name}_len = {tensor_data.size};\n"
             + f'uint8_t {tensor_name}[] __attribute__((section("{section}"), aligned(16))) = "'
         )
         data_hexstr = tensor_data.tobytes().hex()
         for i in range(0, len(data_hexstr), 2):
             header_file.write(f"\\x{data_hexstr[i:i+2]}")
         header_file.write('";\n\n')


 def create_headers(image_name):
     """
     This function generates C header files for the input and output arrays required to run inferences
     """
     img_path = os.path.join("./", f"{image_name}")

     # Resize image to 224x224
     resized_image = Image.open(img_path).resize((224, 224))
     img_data = np.asarray(resized_image).astype("float32")

     # Convert input to NCHW
     img_data = np.transpose(img_data, (2, 0, 1))

     # Create input header file
     input_data = img_data.astype(np.uint8)
     create_header_file("inputs", "ethosu_scratch", "input", input_data, "./include")
     # Create output header file
     output_data = np.zeros([1001], np.uint8)
     create_header_file(
         "outputs",
         "output_data_sec",
         "output",
         output_data,
         "./include",
     )


 if __name__ == "__main__":
     create_headers(sys.argv[1])
从命令行运行脚本:
python convert_image.py ./kitten.jpg
Pre-processing the labels#
The following script will create a labels.h header file in the src directory.
The labels.txt file that we downloaded previously will be turned
into an array of strings. This array will be used to display the label that
our image has been classified as.
#!python ./convert_labels.py
 import os
 import pathlib
 import sys


 def create_labels_header(labels_file, section, output_path):
     """
     This function generates a header file containing the ImageNet labels as an array of strings
     """
     labels_path = pathlib.Path(labels_file).resolve()
     file_path = pathlib.Path(f"{output_path}/labels.h").resolve()

     with open(labels_path) as f:
         labels = f.readlines()

     with open(file_path, "w") as header_file:
         header_file.write(f'char* labels[] __attribute__((section("{section}"), aligned(16))) = {{')

         for _, label in enumerate(labels):
             header_file.write(f'"{label.rstrip()}",')

         header_file.write("};\n")


 if __name__ == "__main__":
     create_labels_header(sys.argv[1], "ethosu_scratch", "./include")
从命令行运行脚本:
python convert_labels.py
Writing the demo application#
The following C application will run a single inference of the MobileNet v1
model on the image that we downloaded and converted to an array of integers
previously. Since the model was compiled with a target of “ethos-u …”,
operators supported by the Ethos™-U55 NPU will be offloaded for acceleration.
Once the application is built and run, our test image should be correctly
classied as a “tabby” and the result should be displayed on the console.
This file should be placed in ./src
 // demo.c
 #include <stdio.h>
 #include <tvm_runtime.h>

 #include "ethosu_mod.h"
 #include "uart.h"

 // Header files generated by convert_image.py and convert_labels.py
 #include "inputs.h"
 #include "labels.h"
 #include "outputs.h"

 int abs(int v) { return v * ((v > 0) - (v < 0)); }

 int main(int argc, char** argv) {
   uart_init();
   printf("Starting Demo\n");
   EthosuInit();

   printf("Allocating memory\n");
   StackMemoryManager_Init(&app_workspace, g_aot_memory, WORKSPACE_SIZE);

   printf("Running inference\n");
   struct tvmgen_default_outputs outputs = {
       .output = output,
   };
   struct tvmgen_default_inputs inputs = {
       .input = input,
   };
   struct ethosu_driver* driver = ethosu_reserve_driver();
   struct tvmgen_default_devices devices = {
       .ethos_u = driver,
   };
   tvmgen_default_run(&inputs, &outputs, &devices);
   ethosu_release_driver(driver);

   // Calculate index of max value
   uint8_t max_value = 0;
   int32_t max_index = -1;
   for (unsigned int i = 0; i < output_len; ++i) {
     if (output[i] > max_value) {
       max_value = output[i];
       max_index = i;
     }
   }
   printf("The image has been classified as '%s'\n", labels[max_index]);

   // The FVP will shut down when it receives "EXITTHESIM" on the UART
   printf("EXITTHESIM\n");
   while (1 == 1)
     ;
   return 0;
 }
Note
If you'd like to use FreeRTOS for task scheduling and queues, a sample application can be found here
`demo_freertos.c
Creating the linker script#
We need to create a linker script that will be used when we build our application in the following section. The linker script tells the linker where everything should be placed in memory. The corstone300.ld linker script below should be placed in your working directory.
An example linker script for the FVP can be found here
corstone300.ld <https://github.com/apache/tvm/blob/main/apps/microtvm/ethosu/corstone300.ld>_
Note
The code generated by TVM will place the model weights and the Arm(R) Ethos(TM)-U55 command stream in a section named ``ethosu_scratch``. For a model the size of MobileNet v1, the weights and command stream will not fit into the limited SRAM available. For this reason it's important that the linker script places the ``ethosu_scratch`` section into DRAM (DDR).
Note
Before building and running the application, you will need to update your PATH environment variable to include the path to cmake 3.19.5 and the FVP. For example if you've installed these in ``/opt/arm`` , then you would do the following:
export PATH=/opt/arm/FVP_Corstone_SSE-300_Ethos-U55/models/Linux64_GCC-6.4:/opt/arm/cmake/bin:$PATH
Building the demo application using make#
We can now build the demo application using make. The Makefile should be placed
in your working directory before running make on the command line:
An example Makefile can be found here:
Makefile <https://github.com/apache/tvm/blob/main/apps/microtvm/ethosu/Makefile>_
Note
If you're using FreeRTOS, the Makefile builds it from the specified FREERTOS_PATH:
``make FREERTOS_PATH=
Running the demo application#
Finally, we can run our demo appliction on the Fixed Virtual Platform (FVP), by using the following command:
… code-block:: bash
FVP_Corstone_SSE-300_Ethos-U55 -C cpu0.CFGDTCMSZ=15 \
-C cpu0.CFGITCMSZ=15 -C mps3_board.uart0.out_file=\"-\" -C mps3_board.uart0.shutdown_tag=\"EXITTHESIM\" \
-C mps3_board.visualisation.disable-visualisation=1 -C mps3_board.telnetterminal0.start_telnet=0 \
-C mps3_board.telnetterminal1.start_telnet=0 -C mps3_board.telnetterminal2.start_telnet=0 -C mps3_board.telnetterminal5.start_telnet=0 \
-C ethosu.extra_args="--fast" \
-C ethosu.num_macs=256 ./build/demo
You should see the following output displayed in your console window:
… code-block:: text
telnetterminal0: Listening for serial connection on port 5000
telnetterminal1: Listening for serial connection on port 5001
telnetterminal2: Listening for serial connection on port 5002
telnetterminal5: Listening for serial connection on port 5003

    Ethos-U rev dedfa618 --- Jan 12 2021 23:03:55
    (C) COPYRIGHT 2019-2021 Arm Limited
    ALL RIGHTS RESERVED

Starting Demo
ethosu_init. base_address=0x48102000, fast_memory=0x0, fast_memory_size=0, secure=1, privileged=1
ethosu_register_driver: New NPU driver at address 0x20000de8 is registered.
CMD=0x00000000
Soft reset NPU
Allocating memory
Running inference
ethosu_find_and_reserve_driver - Driver 0x20000de8 reserved.
ethosu_invoke
CMD=0x00000004
QCONFIG=0x00000002
REGIONCFG0=0x00000003
REGIONCFG1=0x00000003
REGIONCFG2=0x00000013
REGIONCFG3=0x00000053
REGIONCFG4=0x00000153
REGIONCFG5=0x00000553
REGIONCFG6=0x00001553
REGIONCFG7=0x00005553
AXI_LIMIT0=0x0f1f0000
AXI_LIMIT1=0x0f1f0000
AXI_LIMIT2=0x0f1f0000
AXI_LIMIT3=0x0f1f0000
ethosu_invoke OPTIMIZER_CONFIG
handle_optimizer_config:
Optimizer release nbr: 0 patch: 1
Optimizer config cmd_stream_version: 0 macs_per_cc: 8 shram_size: 48 custom_dma: 0
Optimizer config Ethos-U version: 1.0.6
Ethos-U config cmd_stream_version: 0 macs_per_cc: 8 shram_size: 48 custom_dma: 0
Ethos-U version: 1.0.6
ethosu_invoke NOP
ethosu_invoke NOP
ethosu_invoke NOP
ethosu_invoke COMMAND_STREAM
handle_command_stream: cmd_stream=0x61025be0, cms_length 1181
QBASE=0x0000000061025be0, QSIZE=4724, base_pointer_offset=0x00000000
BASEP0=0x0000000061026e60
BASEP1=0x0000000060002f10
BASEP2=0x0000000060002f10
BASEP3=0x0000000061000fb0
BASEP4=0x0000000060000fb0
CMD=0x000Interrupt. status=0xffff0022, qread=4724
CMD=0x00000006
00006
CMD=0x0000000c
ethosu_release_driver - Driver 0x20000de8 released
The image has been classified as 'tabby'
EXITTHESIM
Info: /OSCI/SystemC: Simulation stopped by user.
You should see near the end of the output that the image has been correctly classified as ‘tabby’.