如何与 ultralytics yolov5 对齐
正如上面的文档所描述的,我们实现的模型推理和后处理部分与官方版本是一致的,除了预处理部分,在预处理部分中,我们提供了一种加载 YOLOv5 经过训练的检查点的方法,而不需要预处理。
准备测试环境,图像和模型权重
[1]:
import os
import cv2

import torch

os.environ["CUDA_DEVICE_ORDER"]="PCI_BUS_ID"
os.environ["CUDA_VISIBLE_DEVICES"]="0"

device = torch.device('cuda' if torch.cuda.is_available() else 'cpu')
[2]:
from yolort.models.yolo import YOLO
from yolort.utils import Visualizer, get_image_from_url, read_image_to_tensor
from yolort.v5 import load_yolov5_model, letterbox, non_max_suppression, scale_coords, attempt_download
from yolort.v5.utils.downloads import safe_download
[3]:
img_source = "https://huggingface.co/spaces/zhiqwang/assets/resolve/main/bus.jpg"
# img_source = "https://huggingface.co/spaces/zhiqwang/assets/resolve/main/zidane.jpg"
img_raw = get_image_from_url(img_source)

# Downloaded from 'https://github.com/ultralytics/yolov5/releases/download/v6.1/yolov5n6.pt'
model_path = 'yolov5n6.pt'
checkpoint_path = attempt_download(model_path)
Downloading https://github.com/ultralytics/yolov5/releases/download/v6.1/yolov5n6.pt to yolov5n6.pt...
ERROR: Remote end closed connection without response
Re-attempting https://github.com/ultralytics/yolov5/releases/download/v6.1/yolov5n6.pt to yolov5n6.pt...
  % Total    % Received % Xferd  Average Speed   Time    Time     Time  Current
                                 Dload  Upload   Total   Spent    Left  Speed
  0     0    0     0    0     0      0      0 --:--:--  0:00:16 --:--:--     0
 47 7021k   47 3327k    0     0   187k      0  0:00:37  0:00:17  0:00:20 3311k
100 7021k 100 7021k 0 0 380k 0 0:00:18 0:00:18 --:--:-- 4106k
[4]:
img_size = 640
stride = 64
score_thresh = 0.25
nms_thresh = 0.45
使用 YOLOv5 的 letterbox 进行图像预处理。
[5]:
image = letterbox(img_raw, new_shape=(img_size, img_size), stride=stride)[0]
image = read_image_to_tensor(image)
image = image.to(device)
image = image[None]
加载 ultralytics 模型并推理
[6]:
model_yolov5 = load_yolov5_model(checkpoint_path, fuse=True)
model_yolov5 = model_yolov5.to(device)
model_yolov5 = model_yolov5.eval()
Fusing layers...
Model Summary: 280 layers, 3239884 parameters, 0 gradients
[7]:
with torch.no_grad():
    yolov5_dets = model_yolov5(image)[0]
    yolov5_dets = non_max_suppression(yolov5_dets, score_thresh, nms_thresh, agnostic=False)[0]
/media/pc/data/4tb/lxw/anaconda3/envs/torch/lib/python3.10/site-packages/torch/functional.py:568: UserWarning: torch.meshgrid: in an upcoming release, it will be required to pass the indexing argument. (Triggered internally at  /opt/conda/conda-bld/pytorch_1646755897462/work/aten/src/ATen/native/TensorShape.cpp:2228.)
  return _VF.meshgrid(tensors, **kwargs)  # type: ignore[attr-defined]
从 ultralytics 更新 yolort 模型权重并推理
[8]:
model_yolort = YOLO.load_from_yolov5(
    checkpoint_path,
    score_thresh=score_thresh,
    nms_thresh=nms_thresh,
    version="r6.0",
)

model_yolort = model_yolort.eval()
model_yolort = model_yolort.to(device)
[9]:
with torch.no_grad():
    yolort_dets = model_yolort(image)
[10]:
print(f"Detection boxes with yolort:\n{yolort_dets[0]['boxes']}")
Detection boxes with yolort:
tensor([[ 44.74414, 232.15417, 157.04732, 538.13800],
        [146.63568, 240.12421, 225.43253, 510.41217],
        [ 13.53423, 134.64479, 494.38141, 448.66479],
        [409.49249, 245.16832, 500.71967, 521.58514],
        [ 12.61000, 334.60873,  65.38911, 529.11676]], device='cuda:0')
[11]:
print(f"Detection scores with yolort:\n{yolort_dets[0]['scores']}")
Detection scores with yolort:
tensor([0.86551, 0.80977, 0.80078, 0.77364, 0.30176], device='cuda:0')
[12]:
print(f"Detection labels with yolort:\n{yolort_dets[0]['labels']}")
Detection labels with yolort:
tensor([0, 0, 5, 0, 0], device='cuda:0')
验证 yolort 和 ultralytics 的检测结果
[13]:
# Testing boxes
torch.testing.assert_allclose(yolort_dets[0]['boxes'], yolov5_dets[:, :4])
# Testing scores
torch.testing.assert_allclose(yolort_dets[0]['scores'], yolov5_dets[:, 4])
# Testing labels
torch.testing.assert_allclose(yolort_dets[0]['labels'], yolov5_dets[:, 5].to(dtype=torch.int64))

print("Exported model has been tested, and the result looks good!")
Exported model has been tested, and the result looks good!
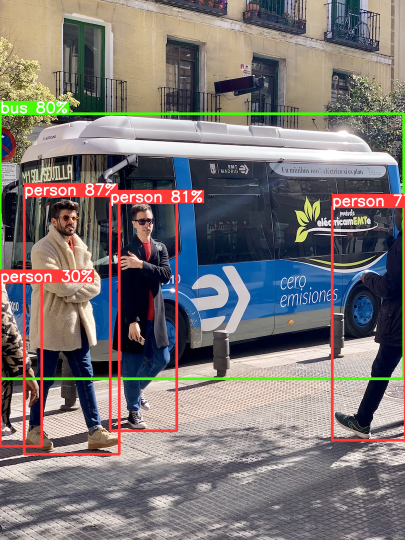
可视化检测的输出
哈,这就是正确调整 box 的诀窍。需要将推理结果缩放回图像的原始比例。
[14]:
scale_coords(image.shape[2:], yolort_dets[0]['boxes'], img_raw.shape[:-1])
[14]:
tensor([[ 48.50573, 391.76016, 238.01735, 908.10785],
        [220.44771, 405.20959, 353.41739, 861.32056],
        [  0.00000, 227.21309, 807.26862, 757.12183],
        [664.01855, 413.72153, 810.00000, 880.17493],
        [  0.00000, 564.65222,  83.34413, 892.88452]], device='cuda:0')
[15]:
v = Visualizer(img_raw, model_yolov5.names)
# Prepare the prediction labels for the Visualizer
v.draw_instance_predictions(yolort_dets[0])
v.imshow(scale=0.5)
View this document as a notebook: https://github.com/zhiqwang/yolov5-rt-stack/blob/main/notebooks/how-to-align-with-ultralytics-yolov5.ipynb