yolort 和 yolov5 的差异
现在的 yolort 采用了与官方 yolov5 相同的模型结构。yolort 和 YOLOv5 的主要区别在于预处理和后处理的策略。我们采用与官方不同的策略的主要原因是使预处理和后处理模块可以 jit 跟踪和脚本化。由此可以得到端到端的 graph,用于 LibTorch,ONNX Runtime 和 TVM 的推理。
对于预处理,YOLOv5 使用 letterboxing (padding) 调整大小来保持长宽比。 该误差来自于调整大小时使用的 interpolate 算子。YOLOv5 在输入 uint8 [0-255] 图像上使用 cv2.resize 算子,OpenCV 中的算子是不可追踪或脚本化的,所以在 yolort中 使用
torch.nn.functional.interpolate。幸运的是,PyTorch 的 interpolation 算子与 OpenCV 的插值算子是一致的,但是 PyTorch 的 interpolate 现在 只支持 float 数据类型,只能对 cast 为 float 类型的图像进行运算,因此会引入一些误差。
YOLOv5 提供了非常强大的功能来进行后期处理,我们只实现了 non-agnostic 版本,但这里的准确性应该能够与原始版本一致。详见 文档 。
准备测试环境,图像和模型权重
[1]:
import os
import torch

os.environ["CUDA_DEVICE_ORDER"]="PCI_BUS_ID"
os.environ["CUDA_VISIBLE_DEVICES"]="0"

device = torch.device('cuda' if torch.cuda.is_available() else 'cpu')
[2]:
import cv2
from yolort.models import YOLOv5
from yolort.utils import Visualizer, cv2_imshow, read_image_to_tensor
from yolort.utils.image_utils import parse_single_image
from yolort.v5 import load_yolov5_model, letterbox, non_max_suppression, scale_coords, attempt_download
from yolort.v5.utils.downloads import safe_download
[3]:
img_size = 640
stride = 64
score_thresh = 0.35
nms_thresh = 0.45
fixed_shape = None
[4]:
# img_source = "https://huggingface.co/spaces/zhiqwang/assets/resolve/main/bus.jpg"
img_source = "https://huggingface.co/spaces/zhiqwang/assets/resolve/main/zidane.jpg"
img_path = img_source.split("/")[-1]
safe_download(img_path, img_source)
Downloading https://huggingface.co/spaces/zhiqwang/assets/resolve/main/zidane.jpg to zidane.jpg...
[5]:
# Downloaded from 'https://github.com/ultralytics/yolov5/releases/download/v6.1/yolov5s6.pt'
model_path = 'yolov5s6.pt'
checkpoint_path = attempt_download(model_path)
Downloading https://github.com/ultralytics/yolov5/releases/download/v6.1/yolov5s6.pt to yolov5s6.pt...
ERROR: Remote end closed connection without response
Re-attempting https://github.com/ultralytics/yolov5/releases/download/v6.1/yolov5s6.pt to yolov5s6.pt...
  % Total    % Received % Xferd  Average Speed   Time    Time     Time  Current
                                 Dload  Upload   Total   Spent    Left  Speed
  0     0    0     0    0     0      0      0 --:--:-- --:--:-- --:--:--     0
 91 24.7M   91 22.5M    0     0  2451k      0  0:00:10  0:00:09  0:00:01 4343k
100 24.7M 100 24.7M 0 0 2568k 0 0:00:09 0:00:09 --:--:-- 4888k
加载 ultralytics 模型并推理
YOLOv5 提供了名为 AutoShape 的输入健壮模型包装器,用于传递 cv2/np/PIL/torch 输入,包括预处理、推理和后处理(NMS)。这个包装器目前只对 pytorch 推理有效。为了揭示内部的本质,我们使用了名为 yolov5 的普通接口。
先做预处理部分。
[6]:
# Preprocess
img_raw = cv2.imread(img_path)

img_shape = (img_size, img_size)
auto_rectangle = not fixed_shape
image = letterbox(img_raw, new_shape=img_shape, stride=stride, auto=auto_rectangle)[0]
image = read_image_to_tensor(image)
image = image.to(device)
image = image[None]
[7]:
vis = parse_single_image(image[0])
可视化这个有 letterboxed 的图像。
[8]:
cv2_imshow(vis, imshow_scale=0.75, convert_bgr_to_rgb=False)

[9]:
model_yolov5 = load_yolov5_model(checkpoint_path)
model_yolov5 = model_yolov5.to(device)
model_yolov5 = model_yolov5.eval()
[10]:
with torch.no_grad():
    yolov5_dets = model_yolov5(image)[0]
    yolov5_dets = non_max_suppression(yolov5_dets, score_thresh, nms_thresh, agnostic=False)[0]
/media/pc/data/4tb/lxw/anaconda3/envs/torch/lib/python3.10/site-packages/torch/functional.py:568: UserWarning: torch.meshgrid: in an upcoming release, it will be required to pass the indexing argument. (Triggered internally at  /opt/conda/conda-bld/pytorch_1646755897462/work/aten/src/ATen/native/TensorShape.cpp:2228.)
  return _VF.meshgrid(tensors, **kwargs)  # type: ignore[attr-defined]
然后将坐标恢复到图像的原始比例。
[11]:
boxes_yolov5 = scale_coords(image.shape[2:], yolov5_dets[:, :4], img_raw.shape[:-1])
labels_yolov5 = yolov5_dets[:, 5].to(dtype=torch.int64)
scores_yolov5 = yolov5_dets[:, 4]
可以将完成后处理后的推理结果可视化。并首先设置标签名称。
[12]:
label_source = "https://huggingface.co/spaces/zhiqwang/assets/resolve/main/coco.names"
label_path = label_source.split("/")[-1]
safe_download(label_path, label_source)
Downloading https://huggingface.co/spaces/zhiqwang/assets/resolve/main/coco.names to coco.names...
[13]:
v = Visualizer(img_raw, metalabels=label_path)
# Prepare the prediction labels for the Visualizer
predictions = {"boxes": boxes_yolov5, "labels": labels_yolov5, "scores": scores_yolov5}
v.draw_instance_predictions(predictions)
v.imshow(scale=0.5)
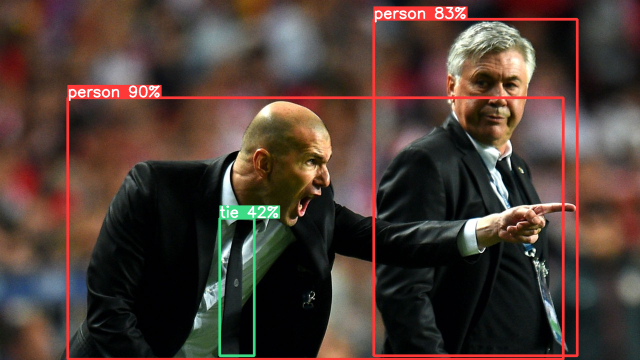
这时,已经完成了 yolov5 的整个推理过程。
使用 yolort 方法进行推理
yolort 现在支持加载 yolov5 训练的模型。这里还有端到端推理管道,该管道同时支持 jit 跟踪和脚本化模式。该模型可用于导出 ONNX 和 torchscript graph,并在 ONNX Runtime, LibTorch 和 TVM VirtualMachine 后端进行推理。
[14]:
model_yolort = YOLOv5.load_from_yolov5(
    checkpoint_path,
    score_thresh=score_thresh,
    nms_thresh=nms_thresh,
    size_divisible=stride,
    fixed_shape=fixed_shape,
)

model_yolort = model_yolort.eval()
model_yolort = model_yolort.to(device)
它的接口也很容易使用。
[15]:
with torch.no_grad():
    yolort_dets = model_yolort.predict(img_path)
[16]:
boxes_yolort = yolort_dets[0]['boxes']
labels_yolort = yolort_dets[0]['labels']
scores_yolort = yolort_dets[0]['scores']
验证 yolort 和 ultralytics 之间的检测结果
打印出两个推理的结果。
[17]:
print(f"Detection boxes with yolov5:\n{boxes_yolov5}\n")
print(f"Detection boxes with yolort:\n{boxes_yolort}")
Detection boxes with yolov5:
tensor([[ 135.26688,  195.07529, 1126.30615,  718.77856],
        [ 747.54639,   38.90421, 1154.26477,  711.03455],
        [ 439.68533,  436.93619,  508.41635,  711.93982]], device='cuda:0')

Detection boxes with yolort:
tensor([[ 135.87936,  195.12320, 1126.14148,  718.72571],
        [ 747.56146,   38.92511, 1154.27393,  710.98151],
        [ 439.76434,  436.97284,  508.33142,  712.02106]], device='cuda:0')
[18]:
print(f"Detection scores with yolov5:\n{scores_yolov5}\n")
print(f"Detection scores with yolort:\n{scores_yolort}")
Detection scores with yolov5:
tensor([0.90279, 0.82556, 0.42047], device='cuda:0')

Detection scores with yolort:
tensor([0.90283, 0.82608, 0.42372], device='cuda:0')
[19]:
print(f"Detection labels with yolort:\n{labels_yolov5}\n")
print(f"Detection labels with yolort:\n{labels_yolort}")
Detection labels with yolort:
tensor([ 0,  0, 27], device='cuda:0')

Detection labels with yolort:
tensor([ 0,  0, 27], device='cuda:0')
[20]:
# Testing boxes
torch.testing.assert_allclose(boxes_yolort, boxes_yolov5, rtol=1e-2, atol=1e-7)
# Testing scores
torch.testing.assert_allclose(scores_yolort, scores_yolov5, rtol=1e-3, atol=1e-2)
# Testing labels
torch.testing.assert_allclose(labels_yolort, labels_yolov5)

print("Exported model has been tested, and the result looks good!")
Exported model has been tested, and the result looks good!
从这个结果中可以看到,boxes 中仍然有一些差异,但分数和标签是相对准确的。
View this document as a notebook: https://github.com/zhiqwang/yolov5-rt-stack/blob/main/notebooks/comparison-between-yolort-vs-yolov5.ipynb