IDE 集成
MLC LLM 现在支持在多个 IDE 上进行代码补全。这意味着您可以通过 MLC LLM 的 REST API 轻松将具有编码能力的大语言模型集成到您的 IDE 中。这里我们提供了如何实现这一点的逐步指南。
转换模型权重
要在任何平台上使用 MLC LLM 运行模型,您需要将模型权重转换为 MLC 格式(例如 CodeLlama-7b-hf-q4f16_1-MLC)。您可以随时参考 转换模型权重 以获取有关如何转换模型权重的详细说明。如果您使用的是自己的模型权重,即您在个人代码库上微调了模型,那么按照这些步骤正确转换相应的权重非常重要。然而,也可以从原始模型下载预编译的权重,这些权重以 MLC 格式提供。查看所有预编译权重的完整列表 此处。
示例
# convert model weights
mlc_llm convert_weight ./dist/models/CodeLlama-7b-hf \
   --quantization q4f16_1 \
   -o ./dist/CodeLlama-7b-hf-q4f16_1-MLC
编译模型
编译模型架构是优化给定平台推理的关键步骤。然而,编译依赖于多个会影响运行时的设置。此配置在 mlc-chat-config.json 文件中指定,该文件可以通过 gen_config 命令生成。您可以了解更多关于 gen_config 命令的信息 此处。
示例
# generate mlc-chat-config.json
mlc_llm gen_config ./dist/models/CodeLlama-7b-hf \
   --quantization q4f16_1 --conv-template LM \
   -o ./dist/CodeLlama-7b-hf-q4f16_1-MLC
备注
请确保将 --conv-template 标志设置为 LM。此模板专门用于执行普通的 LLM 补全,通常被代码补全模型采用。
生成 MLC 模型配置文件后,我们就可以编译并创建模型库了。您可以了解更多关于 compile 命令的信息 此处。
示例
# compile model library with specification in mlc-chat-config.json
mlc_llm compile ./dist/CodeLlama-7b-hf-q4f16_1-MLC/mlc-chat-config.json \
   --device cuda -o ./dist/libs/CodeLlama-7b-hf-q4f16_1-cuda.so
对于 M 芯片的 Mac:
# compile model library with specification in mlc-chat-config.json
mlc_llm compile ./dist/CodeLlama-7b-hf-q4f16_1-MLC/mlc-chat-config.json \
   --device metal -o ./dist/libs/CodeLlama-7b-hf-q4f16_1-metal.so
在 M 芯片的 Mac 上为 Intel Mac 进行交叉编译:
# compile model library with specification in mlc-chat-config.json
mlc_llm compile ./dist/CodeLlama-7b-hf-q4f16_1-MLC/mlc-chat-config.json \
   --device metal:x86-64 -o ./dist/libs/CodeLlama-7b-hf-q4f16_1-metal_x86_64.dylib
For Intel Mac:
# compile model library with specification in mlc-chat-config.json
mlc_llm compile ./dist/CodeLlama-7b-hf-q4f16_1-MLC/mlc-chat-config.json \
   --device metal -o ./dist/libs/CodeLlama-7b-hf-q4f16_1-metal_x86_64.dylib
For Linux:
# compile model library with specification in mlc-chat-config.json
mlc_llm compile ./dist/CodeLlama-7b-hf-q4f16_1-MLC/mlc-chat-config.json \
   --device vulkan -o ./dist/libs/CodeLlama-7b-hf-q4f16_1-vulkan.so
For Windows:
# compile model library with specification in mlc-chat-config.json
mlc_llm compile ./dist/CodeLlama-7b-hf-q4f16_1-MLC/mlc-chat-config.json \
   --device vulkan -o ./dist/libs/CodeLlama-7b-hf-q4f16_1-vulkan.dll
备注
生成的模型库可以在多个模型变体之间共享,只要架构和参数数量不变,例如相同的架构但不同的权重(您的微调模型)。
设置推理入口点
您现在可以使用 MLC serve 模块在本地部署编译后的模型。要了解更多关于 MLC LLM API 的详细信息,请访问我们的 REST API 页面。
示例
python -m mlc_llm.serve.server \
   --model dist/CodeLlama-7b-hf-q4f16_1-MLC \
   --model-lib ./dist/libs/CodeLlama-7b-hf-q4f16_1-cuda.so
Configure the IDE Extension
部署 LLM 后,我们可以轻松地将 IDE 与 MLC Rest API 连接。在本指南中,我们将使用 Hugging Face 代码补全扩展 llm-ls,它支持多个 IDE(例如 vscode、intellij 和 nvim)以连接到外部 OpenAI 兼容 API(即我们的 MLC LLM REST API)。
在您的 IDE 上安装扩展后,打开 settings.json 扩展配置文件:

然后,确保将以下设置替换为相应的值:
"llm.modelId": "dist/CodeLlama-7b-hf-q4f16_1-MLC"
"llm.url": "http://127.0.0.1:8000/v1/completions"
"llm.backend": "openai"
这将使扩展能够向 MLC Serve API 发送 OpenAI 兼容请求。此外,您可以随意调整 API 参数。请参阅 REST API 文档以获取有关这些 API 参数的更多详细信息。
"llm.requestBody": {
   "best_of": 1,
   "frequency_penalty": 0.0,
   "presence_penalty": 0.0,
   "logprobs": false,
   "top_logprobs": 0,
   "logit_bias": null,
   "max_tokens": 128,
   "seed": null,
   "stop": null,
   "suffix": null,
   "temperature": 1.0,
   "top_p": 1.0
}
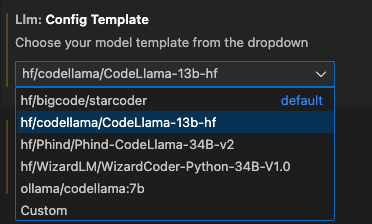
llm-ls 扩展支持多种不同的模型代码补全模板。选择最适合您模型的模板,即具有正确分词器和中间填充标记的模板。

一切设置完成后,扩展将准备好使用来自 MLC Serve API 的响应,在您的 IDE 上提供开箱即用的代码补全功能。

结论
如果您有任何问题,请告诉我们。欢迎在 MLC LLM 仓库 上提出问题!