自动化 GitHub Pages 的部署
如果远离你的个人电脑使你无法写博客,请继续阅读。这篇文章将告诉你如何使用 Travis CI 自动构建和部署。一旦你设置好了,你所需要做的发布文章将是推送到 GitHub 或在 GitHub.com 上创建一个新文件,在任何电脑上都可以!
要想让这一点发挥作用,你需要将你的网站托管在 GitHub 页面上。如果你还没有这样做,请参阅 部署到 GitHub Pages。
注册加入 Travis CI
Travis CI 是一项持续集成服务,用于构建和测试托管在GitHub 的项目。你可以轻松地将你的 GitHub 项目与 Travis CI 同步,用你的 GitHub 账户注册 Travis CI:
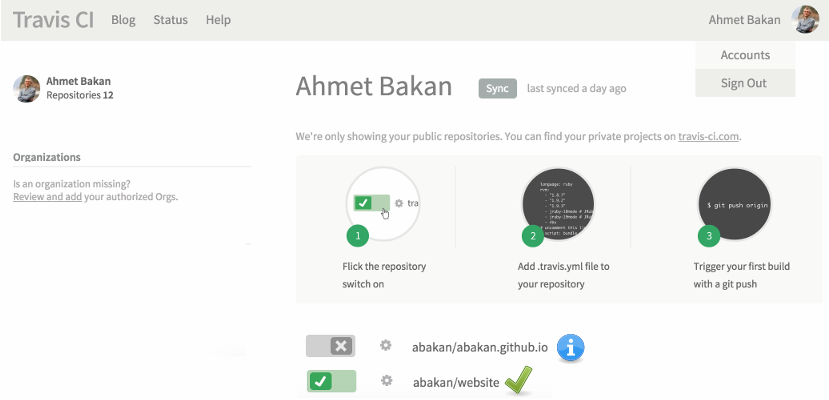
登录后,进入 Accounts 页面,为 GitHub 页面的源仓库打开开关。在下面的例子中,website 是源存储库,sunpy.github.io 包含构建的 HTML 输出:
Deploy key setup
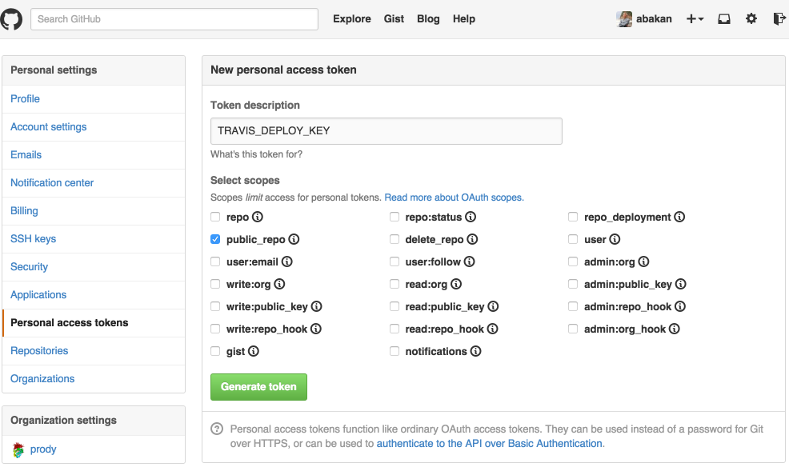
To have builds pushed from Travis CI to GitHub, you will need a personal access token. Go to GitHub page to generate a new token. You need only public repo access checked for this purpose:
Then, you need to set this access token as an environment variable, e.g. DEPLOY_KEY, under .
Keep the Display value in build logs switch off.
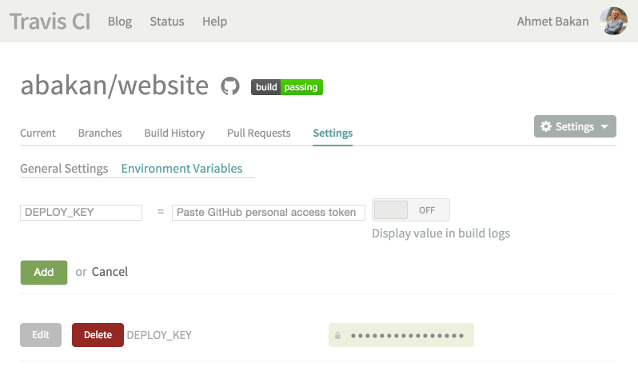
Also, do not forget to flick Build pushes on under :

Configuration file
Finally, you need a .travis.yml in your project that looks like the following:
language: python

python:
  - 2.7

virtualenv:
    system_site_packages: true

before_install:
  - pip install ablog

script:
  - ablog build

after_success:
  - git config --global user.name "Your Name"
  - git config --global user.email "yourname@domain.com"
  - git config --global push.default simple
  - ablog deploy --push-quietly --github-token=DEPLOY_KEY -m="`git log -1 --pretty=%B`"
The main part of the process, that is building of the website, is under script block.
If you repository has dependencies to other Python packages, you can install them in before_install block.
Upon a successful built, your website is deployed.
Note that there is no mention of your GitHub Pages repository, i.e. username.github.io.
That is specified in conf.py file with github_pages.
See 部署到 GitHub Pages and ABlog 命令 to find out more about deploy options.
Finally, you can find out more about .travis.yml file and customizing your built on Travis CI user documentation.